


Before embarking on the task of pressure washing your roof, ensuring safety and effectiveness is paramount. Roof Inspection Before Washing, Choosing the Right Pressure Washer, Using the Correct Nozzle and Pressure—these are key steps to a successful cleaning endeavor. But what about preparing the roof surface, applying cleaning solution safely, and post-washing inspection and maintenance? Stay tuned to uncover essential tips for a hassle-free roof cleaning experience that ensures your home’s longevity and curb appeal.
Key Takeaways
- Conduct thorough roof inspection and preparation for safe pressure washing.
- Choose the right equipment and nozzles to prevent damage.
- Apply cleaning solutions correctly following manufacturer’s guidelines.
- Inspect roof post-washing and prioritize safety measures for maintenance.
Roof Inspection Before Washing
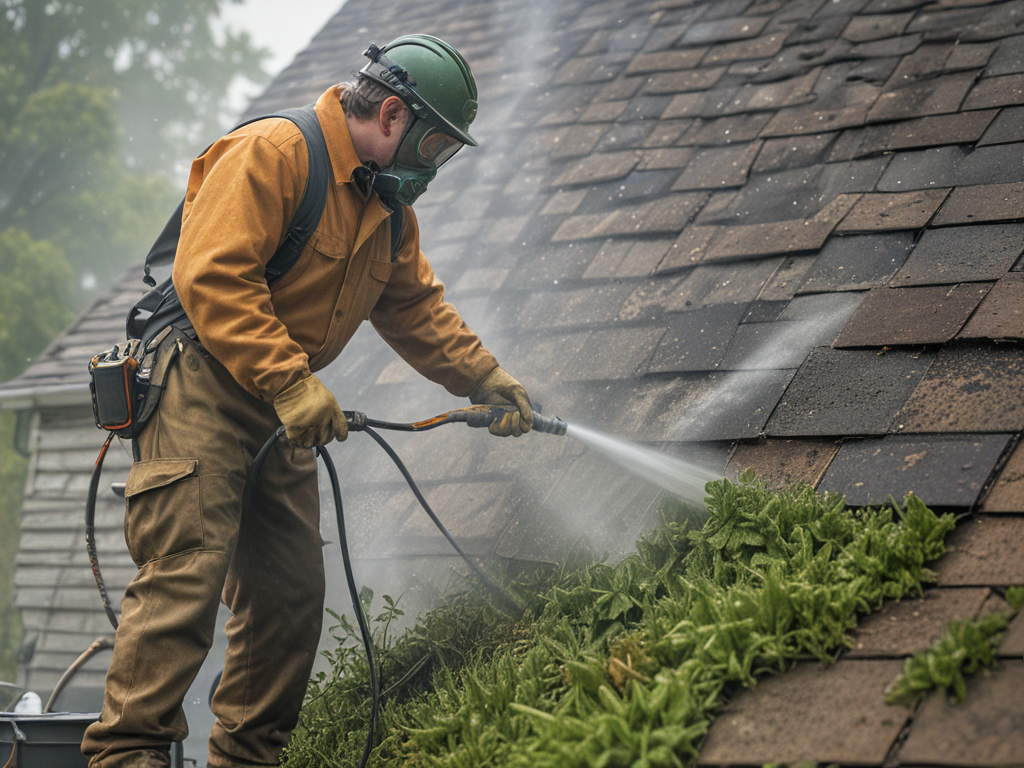
Before pressure washing your roof, I recommend conducting a thorough inspection to identify any areas that may need special attention. When evaluating your roof material, consider whether it’s suitable for pressure washing. Asphalt shingles are generally safe to clean, but delicate materials like slate may require a gentler approach. Take weather conditions into account too; a sunny day is perfect, but avoid washing your roof in the rain unless you’re auditioning for a slip ‘n slide competition.
Inspect for any loose or damaged shingles that could be further compromised by the pressure washer. Look out for moss or algae growth, as these can make your roof a slippery mess. Check for any areas where water may be seeping through, as pressure washing could exacerbate leaks. And don’t forget to clear any debris like leaves or branches that could interfere with the washing process.
Choosing the Right Pressure Washer
When selecting a power washer for your roof, it’s crucial to consider the pressure settings guide to ensure you don’t damage the shingles. I’ll explain how to choose the right pressure washer for your specific roof material and condition. Understanding the power washer’s capabilities will help you achieve a clean roof without causing any harm.
Power Washer Selection
Selecting the appropriate pressure washer is crucial for effectively and safely cleaning your roof. When choosing a power washer, consider its PSI (pounds per square inch) and GPM (gallons per minute) ratings. A medium-duty pressure washer with around 2000-2800 PSI is usually sufficient for most roof cleaning jobs. Remember, higher PSI isn’t always better – too much pressure can damage your roof. Also, check the nozzle tips that come with the pressure washer; for roofs, a 25-degree tip is often recommended for a good balance between cleaning power and safety. Ensure you have necessary equipment maintenance and safety gear, like goggles and non-slip shoes, before starting. Now, let’s get that roof shining – and maybe your neighbors will need sunglasses!
Pressure Settings Guide
Now, let’s explore how to adjust the pressure settings on your pressure washer to ensure optimal cleaning results for your roof. When it comes to pressure washing, it’s crucial to strike the right balance between power and gentleness. For water conservation tips, consider using a lower pressure setting coupled with a wider spray pattern to minimize water usage while still effectively cleaning your roof. If you’re environmentally conscious, think about pressure washing alternatives like eco-friendly cleaning solutions or even manual scrubbing for a more sustainable approach. Remember to take into account the compatibility of the pressure washer settings with your roof material to prevent any damage. By carefully adjusting the pressure settings, you can achieve a clean roof while being mindful of water usage and environmental impact.
Using the Correct Nozzle and Pressure
When pressure washing your roof, it’s crucial to select the correct nozzle for the job. This ensures that the water stream is neither too intense nor too weak, preventing damage to the roof surface. Adjusting the pressure accordingly and following safety precautions will help achieve optimal results without causing harm.
Nozzle Selection Tips
Considering the surface material and level of grime, I adjust the nozzle to ensure the correct pressure for effective roof cleaning. Nozzle maintenance is key to a successful pressure washing session – a clogged or damaged nozzle can lead to uneven pressure distribution and potential damage to your roof. Safety first! I make sure to choose the right nozzle for the job, starting with a wider spray pattern and gradually narrowing it down for tougher spots. Pressure control is crucial; too much pressure can cause shingle damage, while too little won’t effectively clean. By selecting the appropriate nozzle and controlling the pressure, I ensure both the safety of my roof and the effectiveness of the cleaning process.
Pressure Adjustment Guidelines
To ensure safe and effective pressure washing of your roof, always adjust the pressure according to the correct nozzle and surface material. When it comes to pressure control and water flow, here are some guidelines to keep in mind:
-
Select the Right Nozzle: Choose a nozzle that provides adequate pressure without being too harsh on your roof. A nozzle with a wider spray angle can help distribute the pressure more evenly.
-
Start with Low Pressure: Begin with a lower pressure setting to test how the roof surface reacts. You can always increase the pressure gradually if needed, but it’s best to err on the side of caution.
-
Maintain Proper Distance: Keep a safe distance between the nozzle and the roof to prevent damage and ensure thorough cleaning.
Safety Precautions Emphasized
For optimal safety and effectiveness when pressure washing your roof, it is crucial to use the correct nozzle and adjust the pressure accordingly. When it comes to safety gear, always wear goggles to protect your eyes from debris and make sure to use non-slip shoes to prevent any ladder accidents. Speaking of ladders, ensure they are stable and placed on a flat surface. Now, let’s dive into the table below for a quick guide on choosing the right nozzle and pressure settings for your pressure washer:
| Nozzle Type | Best Use |
|---|---|
| 0-Degree | Removing tough stains |
| 15-Degree | Concrete surfaces |
| 25-Degree | Sidewalks, driveways |
| 40-Degree | Siding, gutters |
| Soap Nozzle | Applying detergent |
Preparing the Roof Surface
Preparing the roof surface involves thoroughly inspecting for any debris, moss, or algae that can impede the pressure washing process. It’s like giving your roof a spa day before the deep cleanse!
Steps to Prepare the Roof Surface:
-
Clear Debris: Get rid of those pesky leaves, branches, and any other debris. You don’t want your roof looking like it’s wearing a nature wig during the pressure wash.
-
Remove Moss and Algae: These little green invaders need to go! They can hinder the pressure washing effectiveness. Think of it as evicting unwanted tenants from your roof.
-
Check for Loose Shingles: Make sure your shingles are in place and secure. You don’t want them flying off during the pressure washing dance party. Roof protection is key!
Applying Cleaning Solution Safely
When applying the cleaning solution to your roof, ensure to work in small sections to achieve thorough coverage and effective cleaning. This method allows you to focus on one area at a time, ensuring that no spot is missed. Before starting, it’s essential to take precautions to protect yourself and the surrounding environment. Wear protective gear such as gloves, goggles, and long sleeves to prevent any contact with the cleaning solution. Additionally, make sure to cover any nearby plants or delicate surfaces to avoid damage from the chemicals.
When choosing a cleaning solution, consider the chemical considerations carefully. Different roofs may require specific types of solutions based on the material and the extent of the dirt and stains. Always follow the manufacturer’s instructions for mixing and applying the solution. It’s crucial to use the right dilution ratio to avoid damaging your roof or causing harm to the environment.
Post-Washing Inspection and Maintenance
After pressure washing your roof, conducting a thorough post-washing inspection and maintenance is crucial to ensure its longevity and optimal condition. Here are three essential steps to follow:
-
Gutter Cleaning – Grab a sturdy ladder and some gloves because it’s time to tackle those gutters. Remove any debris that may have accumulated during the pressure washing process. Clogged gutters can lead to water backup, causing damage to your roof and home. Plus, you never know what treasures you might find up there!
-
Shingle Maintenance – Take a close look at your shingles. Look for any signs of damage like cracks, curling, or missing pieces. If you notice any issues, it’s best to address them promptly to prevent further damage. Think of it as giving your roof a spa day – pamper those shingles!
-
Inspect for Leaks – Finally, check for any signs of leaks or water infiltration. A quick inspection can save you from potential headaches down the road. Remember, a dry roof is a happy roof!